How to Create Unit and Assembly Estimates in RSMeans Data Online
Estimate creation is one of the foundational uses of RSMeans Data Online. Often, users develop estimates using unit costs, assembly costs or a combination of the two. In this article, we’ll explore how to develop both types of construction estimates using RSMeans Data Online.
We begin with two key definitions.
Unit Costs: A unit cost refers to the cost of a single unit of material, labor or equipment. In RSMeans Data, the unit cost includes the bare cost plus the contractor’s Overhead & Profit (O&P).
Assembly Costs: Assemblies (or “Systems”) are collections of one or more unit cost lines combined to make estimating faster. For example, you could search through the unit cost data to find all of the components of a footing (excavation, forms, reinforcing steel, concrete, etc.) or simply select the closest matching footing assembly that combines all of those materials. Assembly column headings differ from unit cost headings because the Overhead & Profit is included within each assembly cost column.
Creating an Estimate
Here are quick steps for creating a unit cost or assembly estimate in RSMeans Data Online.
- Click Manage Estimates.
OPTION: Select a folder from the left-hand menu first and that folder will be prepopulated in the estimate list window. - Click Create New Estimate.
- On the New Estimate page, fill out all fields relevant to your estimate (details below). Required fields are marked with an asterisk(*).
NOTE: We recommend entering as much information as possible when you create the estimate to make it easier to organize and manage your estimates. You can update information as needed. - Click Save & Continue.
- Locate cost lines you wish to add to the estimate.
- Select lines to add and click Add to Estimate (plus sign icon) to add the line item to your estimate.
- In the Estimate window below the cost catalog, enter a number in the Quantity field for each line item.
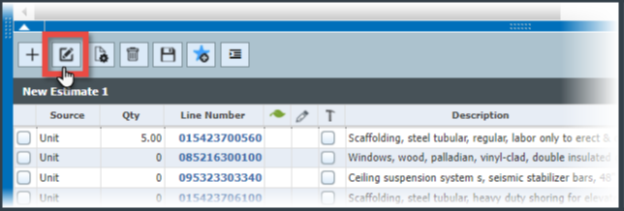
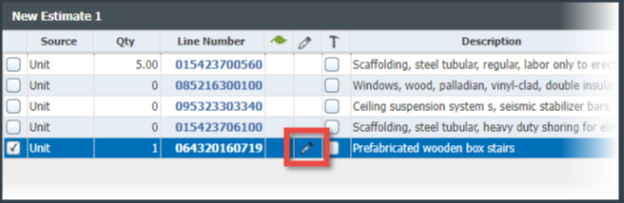
- If you would like to insert custom line items, click the pencil icon within the Estimate window.
- Save the estimate at any time by clicking Save in the Estimate window toolbar.
Detailed steps for creating a unit cost or assembly estimate
- Click the Manage Estimates tab.
OPTION: Select a folder from the left-hand menu first and that folder will be prepopulated in the estimate list window.
NOTE: In the case of Organizational folders you will need permission to create estimates. Contact your account administrator to ensure you have the correct folder and estimate permissions. - Click Create New Estimate.
- On the New Estimate page, fill out all fields relevant to your estimate (details below). Required fields are marked with an asterisk(*).
NOTE: We recommend entering as much information as possible when you create the estimate to make it easier to organize and manage your estimates. The information can be updated throughout the process as needed. - Click Save & Continue.
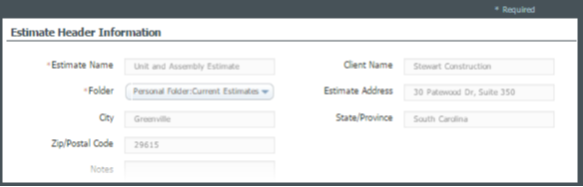
Estimate Header Information
Enter the estimate information in this section. Only the Estimate Name and Folder are required in this section, but it is recommended to enter as much information about your estimate as possible to keep your estimates organized.
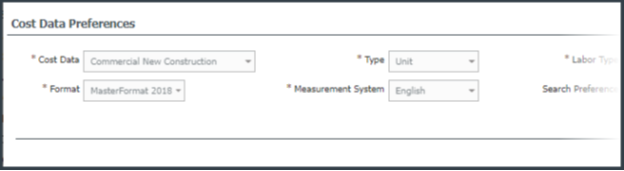
Cost Data Preferences
Change your Cost Data Preferences by choosing the appropriate selection for the following:
- Cost Data: Click the drop-down menu to view a list of the cost datasets available to you for searching.
- Type: Select unit costs or assembly costs. Options available in this field are based upon Cost Data Preference and options purchased.
- Labor Type: Labor Type allows you to select Standard Union, Open Shop, Repair & Remodeling, or Facilities Maintenance & Repair. Selection is based upon Cost Data preference and options purchased.
- Commercial New Construction cost data has the option of choosing between the Standard Union labor type and Open Shop labor.
- Facilities and Commercial Renovation cost data is based on the Repair & Remodeling labor type.
- Residential New Construction cost data is based on the Residential labor type.
- Facility Maintenance & Repair cost data is based on the Facility Maintenance & Repair labor type.
- Location: Click Location to select between locations in the United States or Canada. The default selection is U.S. National Average.
- Format: Based on the Type selected, the format option allows the user to choose MasterFormat® 1995 or MasterFormat® 2018 for unit costs, and UniFormat II for assembly costs.
- Measurement System: Based upon the Cost Data preferences selected, the Measurement System allows you to select US Standard or Metric.
- Search Preference: Here you can choose a default search option. The choices are: All, Any, Exact, Line, or Advanced. The search preference can be changed at anytime in cost catalog toolbar when building an estimate.
- Index: Suggests sections from the catalog as you type (two characters minimum). Once a suggested section is selected, the search will take you straight to that section within the catalog. This works for both unit costs and assembly costs.
- All: Search results will include everything entered in the search field in the entered order.
- Any: Search results will include anything entered in the search field.
- Exact: Search results will include the exact entered text in the search field.
- Line: Type in a partial or complete line number.
- Release: Year and Quarterly Update of RSMeans Data. Selection is based upon purchase date and options purchased. Complete Plus users will have access to predictive data.
NOTE: The Format and Measurement System selections cannot be changed once you click Save & Continue. Each cost data preference is described in detail in the Getting Started section. Once you have filled out all necessary fields, click Save & Continue.
Locating Cost Lines
After you click Save & Continue the estimate building window appears. To begin building your estimate, search for line items within the Cost Catalog above the Estimate window. The cost catalog functions similarly to the Search Data tab.
Adding and Removing Cost Lines
Once you have located the desired cost line, select it by clicking the checkbox next to the item.
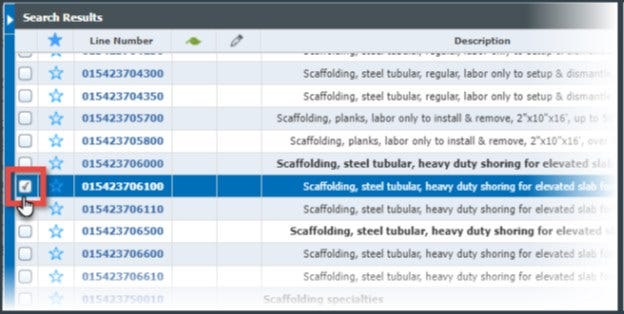
Then, just below the Search Results window, click Add to Estimate using the plus sign icon in the Estimate window toolbar.
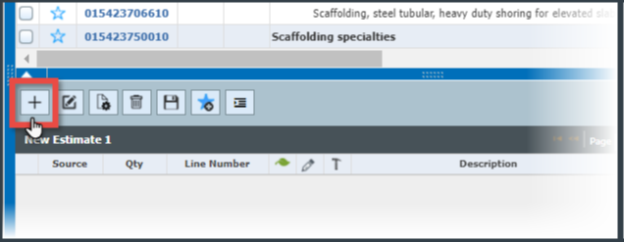
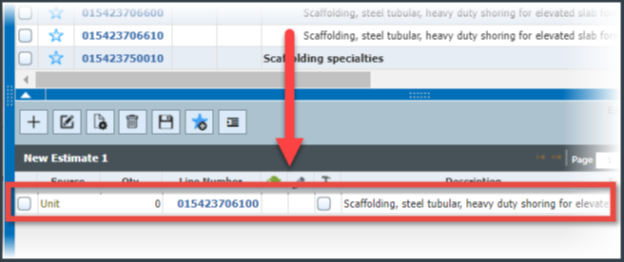
Clicking Add to Estimate copies the item to the bottom section, which displays all of the items you have added to your estimate so far.
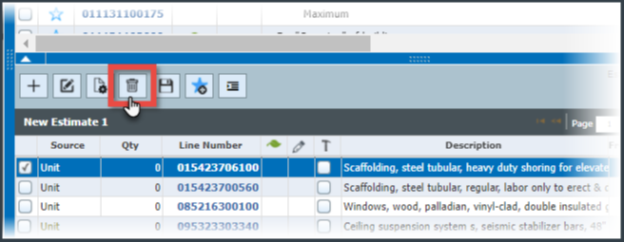
To remove a line from the estimate, select it by clicking the checkbox next to the item, and then click Remove from Estimate, a trash can icon in the Estimate window toolbar.
TIP: Users on the "Complete" tier service level may change the Type field at any time to toggle between unit and assembly cost lines while building their estimates and they can create estimates containing both unit lines and assemblies. Users on the "Core" tier service level may only create unit cost estimates.
Saving Estimates
RSMeans Data Online will automatically save your estimate every so often, but it's highly recommended to save your work manually early and frequently. You can save your estimate at any time by clicking the Save icon.
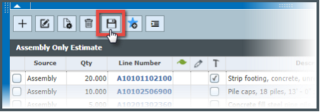
Once the estimate is saved, a confirmation message will display at the top of the screen. You can then access it from the Manage Estimates tab.

These steps and tips will help you accurately and efficiently create unit cost and assembly estimates in RSMeans Data Online.
Specifying the Quantity of a Cost Line
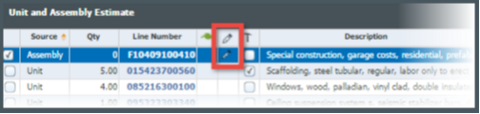
When a cost line is added to an estimate, the Quantity field activates, giving you the ability to enter a number. To enter the quantity of the cost line, click inside the "Qty" column for the item and enter the quantity for that cost line.
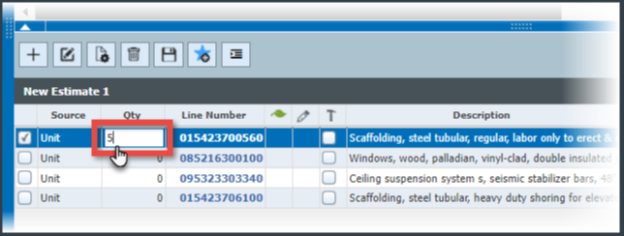
NOTE: The quantity of a line item is based on the cost line’s default unit of measure. Always confirm the cost line's default unit of measure before entering a quantity.
Inserting Custom Cost Data and Lines
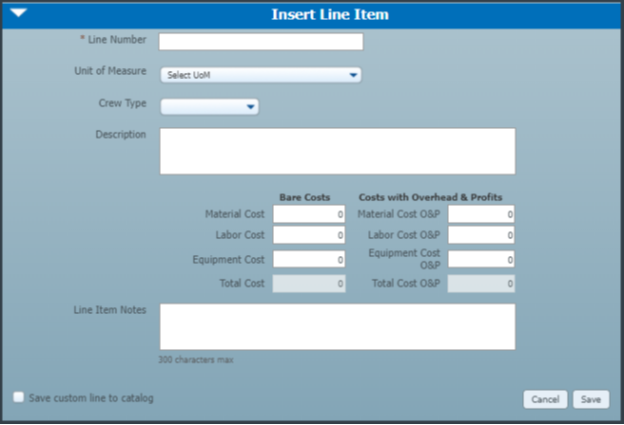
To insert a custom cost line from the Estimate View window, click Insert Custom Line.
The Insert Line Item window will appear. Enter a custom line item number (required) in the Line Number field. Then, enter the costs for your custom line item.
NOTE: This window contains no automatic calculations for O&P. Therefore, if you enter costs in the Costs With Overhead & Profits column, you’ll need to calculate those costs. Total Cost and Total Cost O&P are calculated.
To save this line item to the catalog, enter a checkmark in the box next to “Save custom line to catalog.” Once you've completed the form, click Save. Your custom line item is added to the estimate marked with a pencil icon to show that it is custom.
Subcontracting Cost Lines
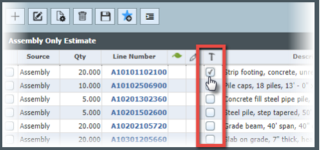
After you add cost lines to an estimate, you can choose to subcontract the line(s). To mark a cost line as Subcontracted, click the checkbox in the Subcontractor column (denoted by a hammer icon) for the designated item. Any items that are marked as Subcontracted will be placed in a Subcontract column within reports. To sort line items within an estimate by Subcontracted, click the Subcontracted column header.
Applying Adjustment Lines
Sometimes called “Percentage” lines, Adjustment Lines are cost data lines located in the unit costs and assembly costs data types that allow you to adjust lines in the estimate by a given percentage(s). These lines have no hard data, only a percentage in one or more fields.
In the graphic below, an Adjustment Line for dust protection has been selected from the Search Results window.

The Bare Material and Bare Labor columns display a percentage, not a dollar value. In this case, 4% will be added to the bare material cost and 11% will be added to the bare labor cost of each line item to which you apply this adjustment line. When you click Add to Estimate , the Apply Percentage screen appears.
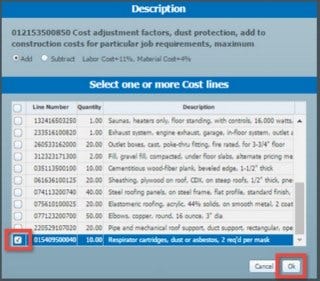
From here, select the lines to which you want to apply the percentage. Click Ok to confirm the adjustments in your estimate.
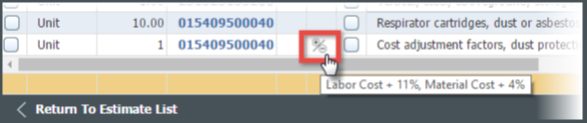
In the estimate, a percent icon in the customized column will note the adjustment. Placing your cursor over the percent icon will display the percentages applied and where they’ve been applied. The adjustment will be recorded into the Notes field in reports.
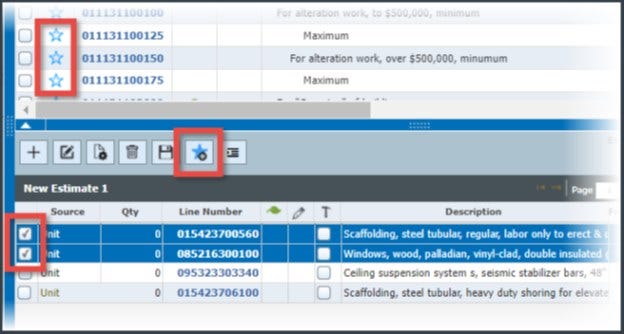
Adding Favorites
When you find a cost line that you'd like to add to your Favorites, click the star icon next to the individual line item in the search results, or select multiple items in your estimate and click Add to Favorites (the star icon) in the Estimate window toolbar. Any line items you add can be accessed in the My Favorites tab.
Work Breakdown Structure (WBS)
RSMeans Data Online Complete and Complete Plus users have access to an area of the Estimate window called Work Breakdown Structure (WBS). This tool allows you to divide your team's deliverable into a more manageable hierarchy of work. You can organize the structure of your WBS in the manner that best fits your deliverable.
NOTE: WBS is an optional tool that can be used during estimate creation.
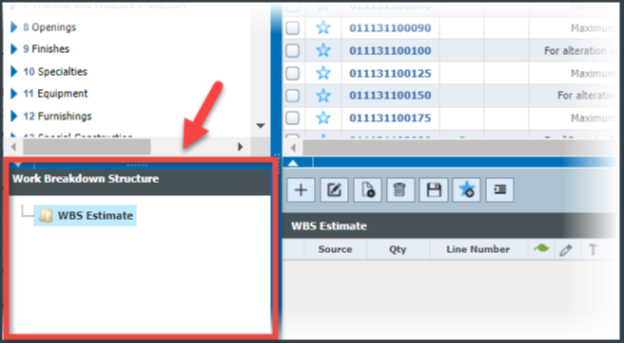
NOTE: At any time, you can click and drag the blue bar above the Work Breakdown Structure section to move it up or down. You can also click the white arrow to quickly hide/reveal the section.
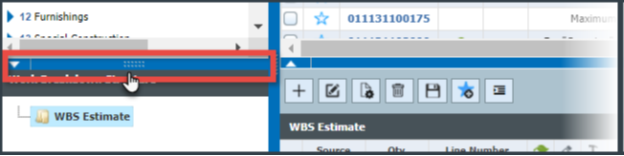
Creating Categories and Subcategories
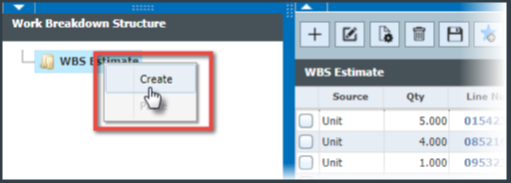
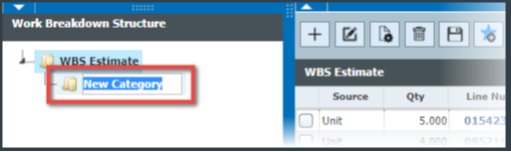
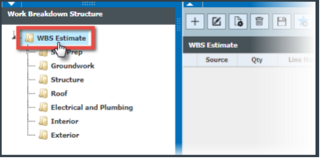
To get started, first create your Work Breakdown Structure by right-clicking the root category, the top-most folder, and selecting Create.
NOTE: The root category will be named after your Estimate Name and can only be changed by changing the estimate header.
In the new subcategory that appears, type in a name for the category and press Enter on your keyboard.
NOTE: There is a 75-character limit for category names.
When you right-click the new subcategory, you will see options to Create, Rename, Delete and Copy the category. To add another subcategory, select Create.
When you right-click the new subcategory, you will see options to Create, Rename, Delete and Copy the category. To add another subcategory, select Create.

A new subcategory will appear below the category you selected. Type in a name and press Enter.
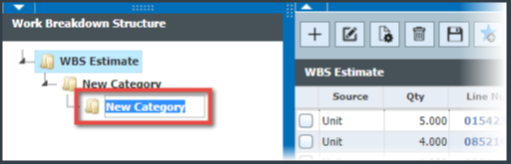
Continue creating categories and subcategories until you have the exact Work Breakdown Structure (WBS) you need for your estimate. You can also add categories and subcategories by clicking the plus sign icon at the bottom of the panel.
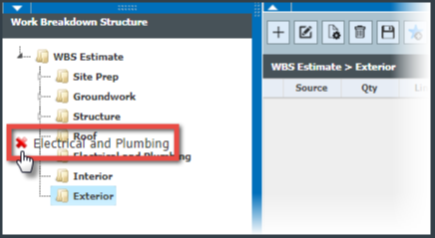
WARNING: If you delete a category that contains line items, the system will also remove those line items from the entire estimate. The system will warn you of this when confirming deletion of the category.
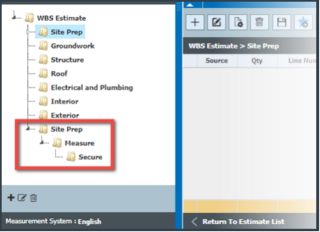
Copying and Pasting Categories
You can copy an entire category and paste it - sub-categories, line items and all - into any destination within the WBS. This can be helpful when you need to quickly create similar categories that contain the same line items (such as Floor 1, Floor 2, etc). To begin, right-click a category and select Copy.
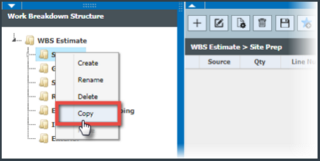
Next, right-click the destination and select Paste.
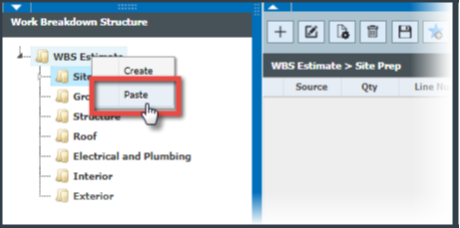
The category and all of its contents - including sub-categories and line items - will be pasted into the destination. At this point you can rename and edit categories.
NOTE: Copied items will be cleared from the clipboard if the cost data or header changes, which will avoid pasting cost lines that are not re-calculated.
Moving Categories
To move a category from one location to another within the WBS, click and drag it to any other location in the structure. A green checkmark will let you know that you may drop the category in this location.
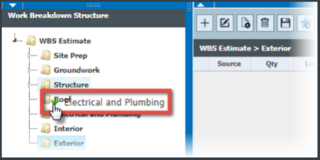
A red checkmark warns you that this is not a legitimate place to drop your category in the structure. All line items within a category will move with the category to the new location.
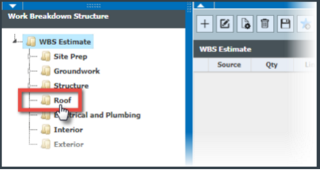
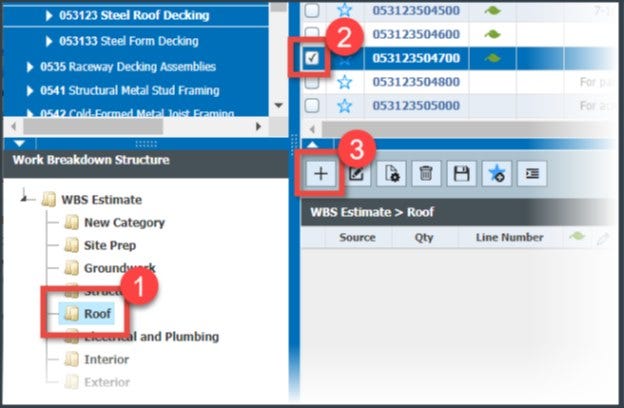
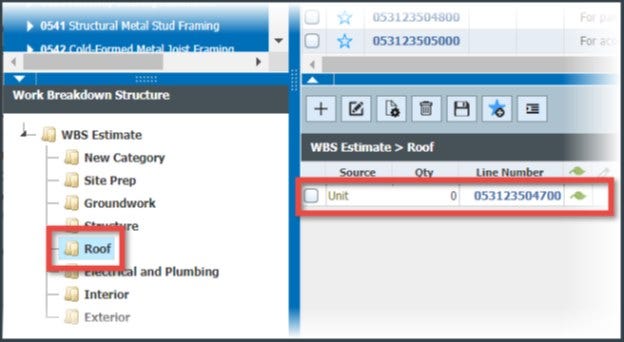
Adding Line Items Directly to Categories
To add line items directly to a category, first select the category in the Work Breakdown Structure you have created.
With the WBS category selected, search for line item(s) you wish to add with the estimate search function. Once you find item(s), first place checkmark(s) next to each item and then click Add to Estimate. The item(s) will be added directly to the category.
Moving Line Items to WBS Categories
To move line items to a WBS category, first select the folder in the WBS that contains the items you wish to move. Once selected, place checkmark(s) next to the line item(s) you wish to move.
NOTE: If you have an existing estimate and this is the first time you're using the WBS, all of your line items will be in the top (root) folder.
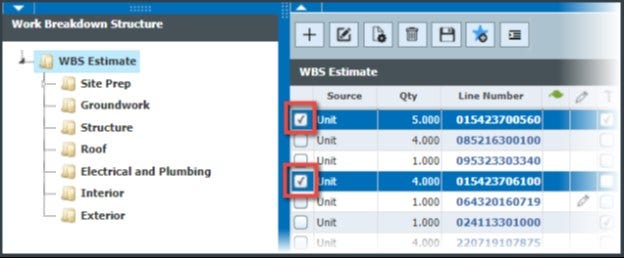
Once you've selected the item(s), click and drag them over to the category of your choice. When you hover over a category, the text will change to "Moving (x) lines(s)" to let you know that the line items are about to be moved to the highlighted category.
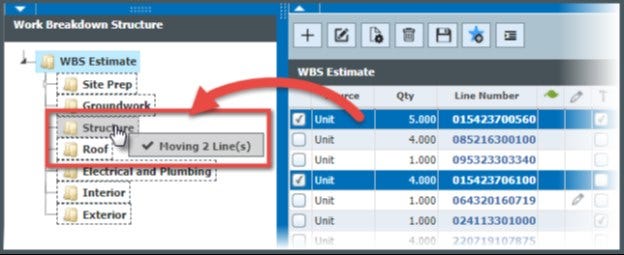
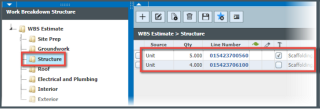
Once moved, you'll receive a message at the top of the screen letting you know that the move was successful. Now when you click that subcategory you will see all line items you have moved there.

Viewing Categories
When you select a category or subcategory, breadcrumbs at the top of the estimate section let you know which level you are viewing in the Work Breakdown Structure.
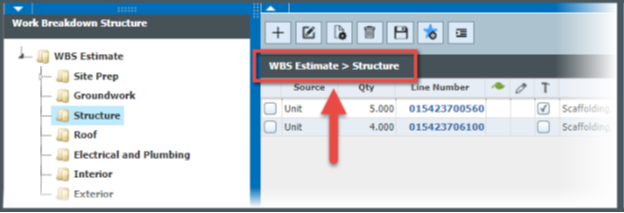
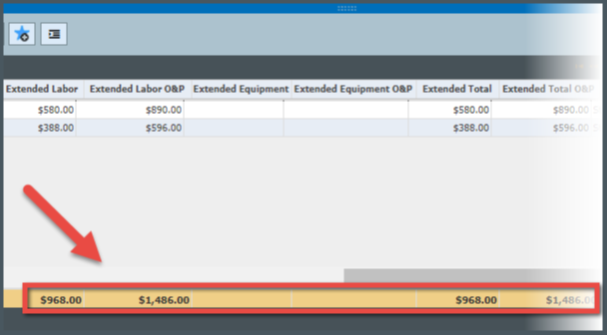
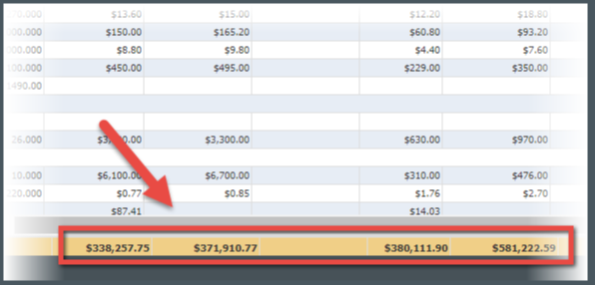
The subtotals shown in the yellow bar at the bottom of the estimate panel are only for the category or subcategory you have selected (in this case, for the "Structure" category).
You can also switch to a read-only aggregate view. First, select the category for which you wish to view all line items (if you choose the root category you will see all line items within all sub-categories).
Next, click Toggle View.
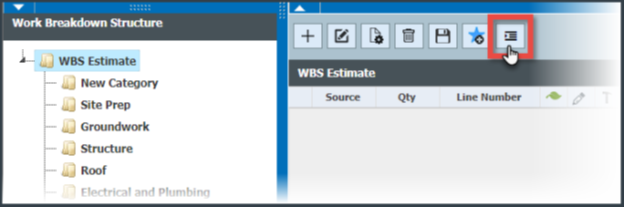
The line item list will update to show all line items under that category, organized by each sub-category within the WBS. If a category contains no line items, it will not be shown in the list.
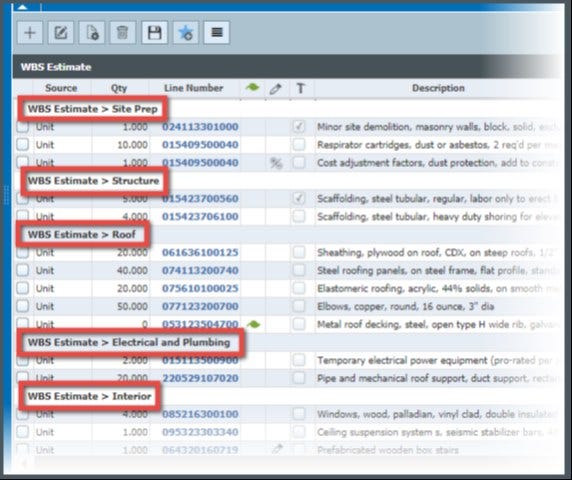
At the bottom of the list, the totals line will display totals for the entire selected category. Since you can't edit in this view, you will need to switch back to the standard view to edit items and categories by clicking Toggle View.
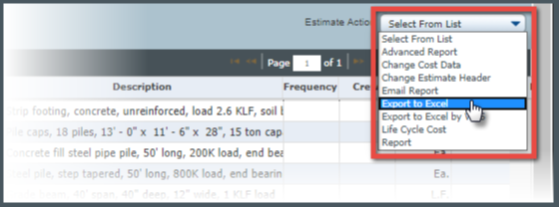
The Estimate Action Menu
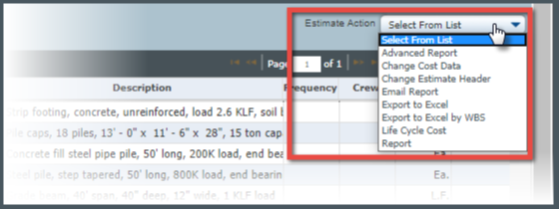
The Estimate Action drop-down menu provides the following actions:
- Build and Save an Advanced Report
- Change Cost Data
- Change Estimate Header
- Comparison Report
- Email Report
- Export to Excel
- Export to Excel by WBS (only for Complete [Full Library] and Complete Plus users)
- Generate Report
NOTE: Some options may be grayed out depending on the type of estimate you are creating or based on your subscription.
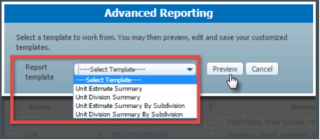
Advanced Report
This action allows you to build a wide variety of report types, customize them and save them to run at any time.
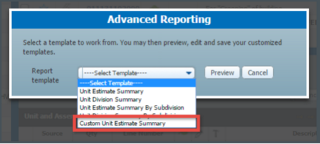
- From the Estimate Action drop-down, click Advanced Report.
- On the Advanced Reporting pop-up, select a Report Template from the drop-down. This affects how the cost lines are displayed in the report.
- Select a template, click Preview.
NOTE: The options in this menu may change depending on the type of estimate you've created.
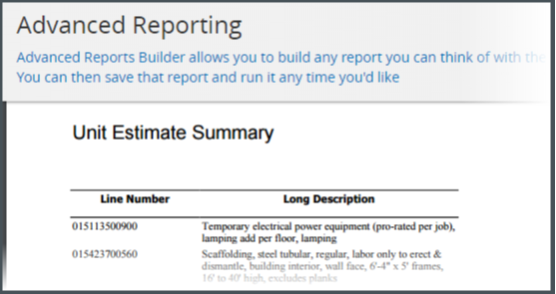
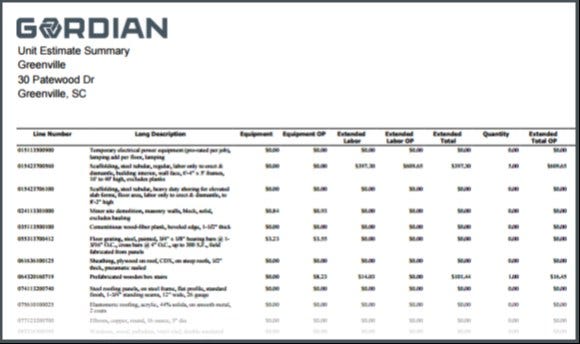
The Advanced Reporting page appears, displaying the cost lines in your estimate according to the template you chose.
To edit what is displayed on the report, click Edit.
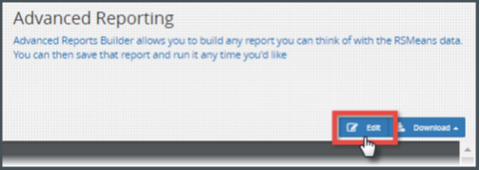
In the Edit pop-up window, click each tab and select the options you would like to see in your report.
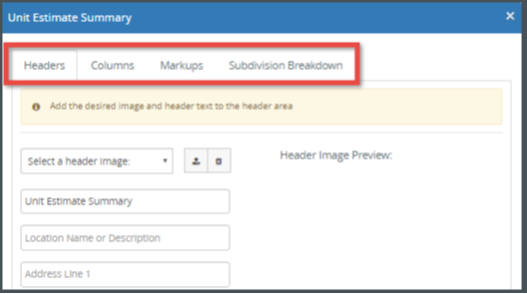
- Headers: This tab allows you to select a Header Image, Report Name, Location Name and Address to display in the header section of the report.
- Columns: This tab allows you to add or remove the columns displayed on the report for cost lines.
- Markups: This tab allows you to apply markups to selected columns within the report.
- Subdivision Breakdown: This tab allows you organize your estimate into MasterFormat or Uniformat subdivisions.
Once you have made all of your changes on each tab, click Preview.

The screen refreshes and your report is displayed with the options you chose.
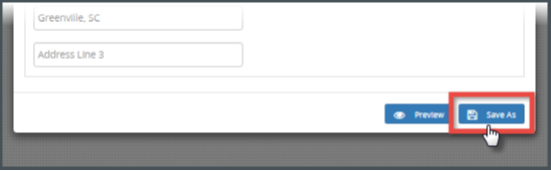
If you wish to make changes to the report or if you are satisfied with the display and wish to save it for later, click Edit.
The Edit window will appear. In this window, you can make more changes and preview them again. Once you're ready to save the report, click Save As.
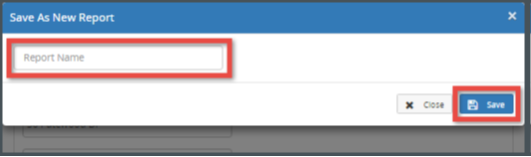
In the Save As New Report window, enter a name for your report and click Save.
The report is saved so that you can run it at any time.
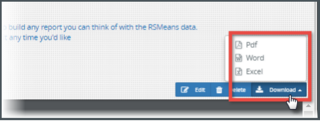
You may also access the report from within the Advanced Reporting window. Click Download and select the file format. The report will then be downloaded to your computer in the file format you chose.
Once you're done with Advanced Reporting, click Return to Estimates in the top-right corner of the page.
The next time you launch Advanced Reporting, any custom reports you saved will display in the Advanced Reporting pop-up window.
Change Cost Data
RSMeans Data Online’s Change Cost Data option allows you to return to the estimate worksheet form to make changes to certain estimate options. The following fields can be changed using the Change Cost Data option:
- Labor Type
- Release
- Location (Country, State/Region, City)
To make changes to these fields, choose Change Cost Data from the Estimate Action menu and alter the selections using the drop downs. Click Save & Continue to return to your estimate where your changes will take effect.
Change Estimate Header
The following fields can be changed by using the Change Estimate Header option from the Estimate Action menu.
- Estimate Name
- Estimate Zip/Postal Code
- Estimate Address
- Client Name
- Estimate City
- Notes
- Estimate State/Province
To make changes to these fields, choose Change Estimate Header and make desired changes in the Estimate Header Information section. Click Save & Continue to return to your estimate where your changes will appear.
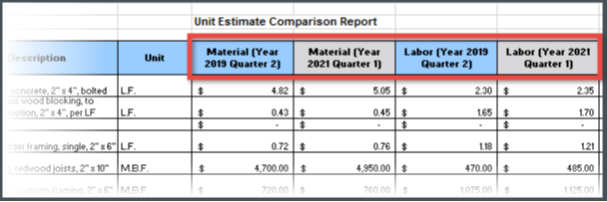
Comparison Report
This tool allows RSMeans Data Online Complete Plus users to view the variance in prices for an estimate between two points in time. To begin, select Comparison Report from the drop-down menu.
The Comparison Report pop-up window will appear. Select the two release dates you wish to compare, and then click Compare. You will be able to select predictive data timeframes here if you wish.

An Excel file will be created and downloaded to your machine. Once opened, you will see the data comparisons underneath each column header.
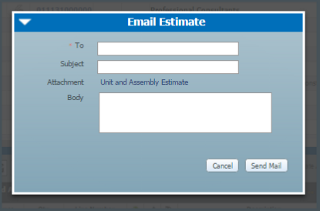
Email Report
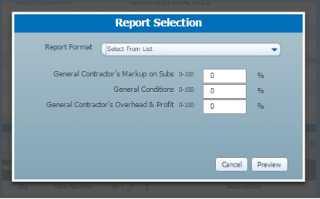
You can email an estimate report directly from within RSMeans Data Online. From the Estimate Action menu choose Email Report. In the Report Selection window, choose Report Format and any other options you would like to include in the report.
Once you've chosen the options, click Preview to view the report before sending, or click Email to email the report. In the Email Estimate window, enter the recipient's email address in the To field, enter text into the Subject field (this will appear as the email subject line) and enter a message in the Body field. When you're ready to send the email, click Send Email. The email will be sent and you will be returned to the estimate screen.
Export to Excel
The current estimate can be exported into an Excel spreadsheet. Exporting the current estimate requires that Excel be loaded on your computer. To export to Excel, select Export to Excel from the Estimate Action menu.
The file will automatically download to your computer in the default folder you have selected. From there you can open the file and the estimate will be formatted into a spreadsheet.
If necessary, you can continue working on your estimate in Excel since the spreadsheet contains formulas to recalculate totals when quantities are changed.
NOTE: Any updates made to the Excel spreadsheet do NOT synchronize back to the online estimate.
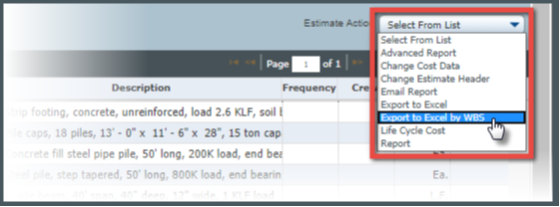
Export to Excel by WBS
If you're using Work Breakdown Structure to categorize your estimate, you can export to Excel with the Work Breakdown Structure intact by selecting Export to Excel by WBS from the Estimate Action menu.
NOTE: Exporting mixed (unit + assembly) estimates is not available at this time.
The file will automatically download to your computer in the default folder you have selected. From there you can open the file and the estimate will be formatted into a spreadsheet.
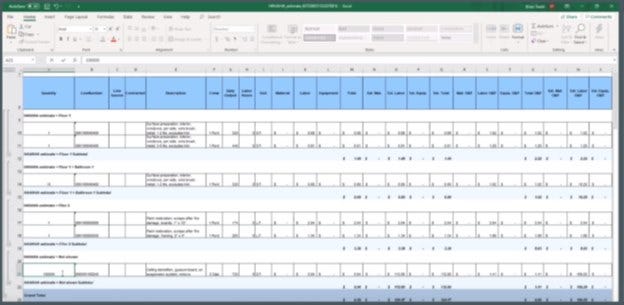
The exported WBS Excel spreadsheet will retain your Work Breakdown Structure and include subtotals for each category, as well as a grand total for the entire estimate. If necessary, you can continue working on your estimate in Excel since the spreadsheet contains formulas to recalculate totals when quantities are changed.
NOTE: Any updates made to the Excel spreadsheet do NOT synchronize back to the online estimate.
NOTE: If a category contains no line items, that category will not display on the Excel spreadsheet.
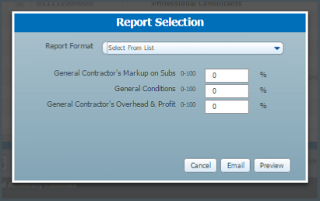
Generate Report
To create a quick basic report based on your estimate, select Report from the Estimate Action menu. In the Report Selection window, select Report Format and any other options you wish to include on the report, and click Preview.
The report is exported as a PDF and downloaded to your computer. In Internet Explorer, the PDF will display in your browser. In Google Chrome, the PDF will download directly to your computer.
Assembly Customization
An assembly is a collection of unit costs. Therefore, the components of an assembly are unit cost line items.
If you have access to assembly cost data and you're using assemblies in your estimate, you can customize the components of an assembly once they’ve been added to an estimate.
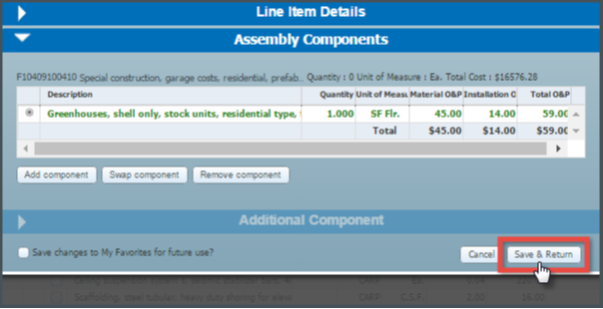
Adding a Component to an Assembly
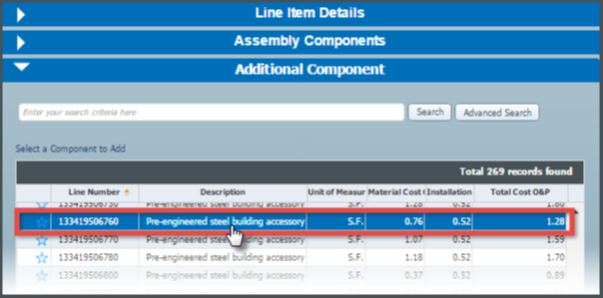
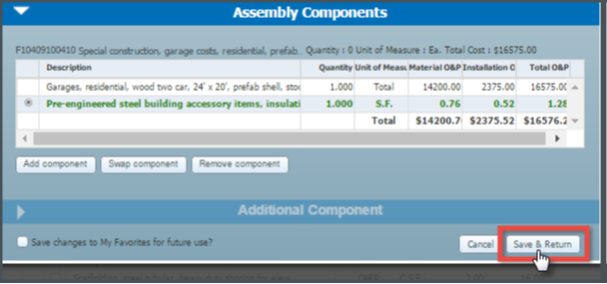
Within an estimate, click the checkbox next to the assembly you wish to customize and then click Customize Assembly in the middle toolbar.

The Customization screen will appear, displaying the current components of the assembly. Select the component that most closely matches the line you want to add and click Add Component.

Use the Search field or scroll through the given results to locate the line item you want to add to the assembly. Click the item to select it.
Once you have selected an item, enter the quantity for the new component in the lower section and click Confirm.
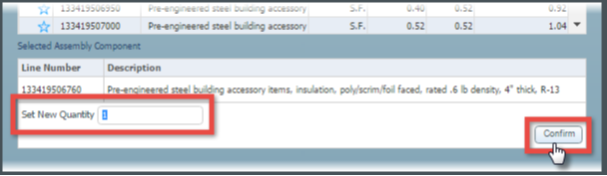
When you're ready to add the component, click Save & Return. (To save this change for later use, place a checkmark next to "Save changes to My Favorites for future use" in the bottom left corner.) In the Estimate window, the amended assembly is designated with a pencil icon to show that it has been customized.
Swapping a Component Within an Assembly
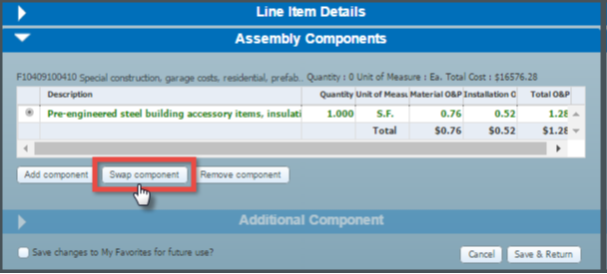
To swap a component within an assembly, follow the steps below. Within an estimate, select the assembly you wish to customize and click Customize Assembly in the middle toolbar.
In the pop-up window that appears, select the component you wish to substitute and click Swap Component.
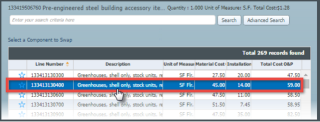
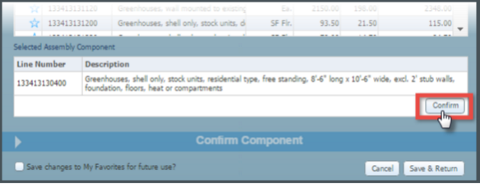
Use the Search field or scroll through the given results to locate the line item you want to swap within the assembly. Click the item to select it. In the lower section of the window, click Confirm.
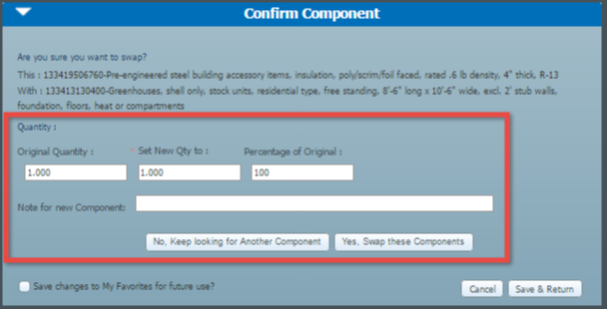
In the Confirm Component section, enter a new quantity or a percentage of the original quantity you wish to add. Enter a note, if necessary, and then click Yes, Swap these Components.
Once you swap components, click Save & Return. In the Estimate window, the amended assembly is designated with a pencil icon to show that it has been customized.
Removing a Component from an Assembly
To remove a component from an assembly, select the assembly you wish to customize and click Customize Assembly in the middle toolbar.

In the window that appears, select the component you wish to remove and then click Remove Component.
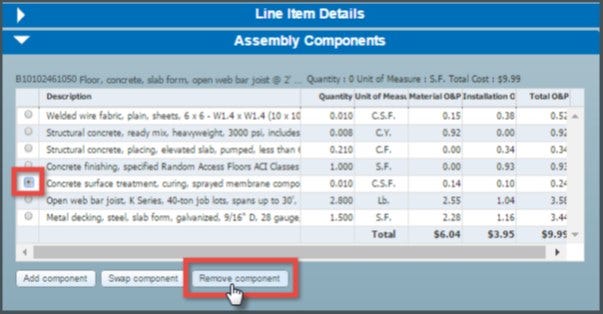
In the confirmation pop-up that appears, click Yes. Once you are done removing components, click Save & Return. In the Estimate window, the amended assembly is designated with a pencil icon to show that it has been customized.
